
info@ucallmlabs.com
```
 ```
```
Sample Prep Protocols
Universal Sample Preparation Protocol (CUT&RUN / CUT&Tag)
This protocol describes starting‑sample preparation workflows for CUT&RUN and CUT&Tag experiments, supporting mammalian materials (suspension cells, adherent cells, tissues, FACS‑sorted cells, cryopreserved nuclei), plant tissues, fungal samples, and zebrafish specimens.
I. Buffer and Reagent Preparation
I. Buffer and Reagent Preparation
1. EDTA‑free Protease Inhibitor Stock Solution
Dissolve EDTA‑free protease inhibitor tablets in molecular biology‑grade water to prepare a stock solution at the concentration recommended by the manufacturer. Aliquot and store at –20°C; avoid repeated freeze‑thaw cycles.
2. Nuclei Extraction Buffer
Use the nuclei extraction buffer supplied with or recommended for your selected kit. Prepare and pre‑chill according to the manufacturer's instructions.
If preparing a custom buffer system, include appropriate buffering agents, osmotic support, nuclease inhibitors, and reducing agents as required for your sample type. Do not vortex the extraction buffer; mix thoroughly by pipetting only.
Note: For larger batch preparations, scale volumes proportionally. For smaller reaction numbers, dilute concentrated stock solutions (e.g., spermidine) before adding to improve pipetting accuracy.
3.Plant Nuclei Isolation Buffer
Use a plant nuclei isolation buffer suitable for your sample type and downstream application. Prepare fresh and pre‑chill before use.
A typical isolation buffer should provide:
- pH buffering capacity to maintain physiological pH
- Osmotic support to preserve nuclear integrity
- Divalent cations for nuclear membrane stabilization
- A mild detergent to facilitate nuclei release from cell walls
- Reducing agents to prevent oxidation
- Protease inhibitors to prevent protein degradation
Note: The optimal buffer composition may vary depending on plant species and tissue type. We recommend testing a small amount of sample first to verify nuclei quality before proceeding with the full experiment.
II. Sample Quality Assessment Criteria
II. Sample Quality Assessment Criteria
Sample quality is assessed across three dimensions:
Morphology/Integrity:
- Mammalian cells (intact cells as starting material): Should exhibit normal morphology for the cell type (e.g., K562 cells appear round)
- Isolated nuclei (both mammalian and plant): Should appear round, with smooth outlines, intact nuclear membranes, and minimal background debris
Viability:
- Mammalian cells (intact cells): Fresh K562 cells ideally show >90% viability by Trypan Blue exclusion.
- Isolated nuclei (mammalian or plant): Viability assessment via Trypan Blue exclusion is not applicable, as isolated nuclei stain positive by default. Evaluate nuclear integrity microscopically instead (see Morphology/Integrity criteria above).
- For mammalian cells, viability may vary across cell types or treatment conditions. If cell viability declines in Wash Buffer, prioritize assessment of total cell count and integrity over viability percentage alone.
Trypan Blue Staining Interpretation: Live, intact cells exclude the dye (bright white, round); dead cells, damaged cells, and isolated nuclei stain positive (blue). For cells sensitive to Trypan Blue, Propidium Iodide (PI) may be used as an alternative. PI requires light‑protected handling. For mammalian intact cell viability assessment, stain live cells directly (no fixation required) ; for nuclei staining, fixation prior to staining is applicable. PI‑positive cells are dead cells or nuclei, with the same interpretation logic as Trypan Blue.
Cell Number:
- Mammalian cells: CUT&RUN requires 500,000 live intact cells per reaction; CUT&Tag requires 100,000 live intact cells per reaction (or the corresponding number of isolated nuclei).
- Plant tissues: Nuclear yield varies substantially across species and tissue types; starting material must therefore be determined empirically. As a general guideline, begin with 0.5–2 g of fresh young tissue and adjust based on nuclear recovery and subsequent library preparation performance.
- Fungal samples:
- Mycelium/spores: Actively growing, healthy, free from contamination.
- Protoplasts: Round, uniform, intact membranes; no mycelial fragments.
- Isolated fungal nuclei: Round, smooth nuclear membranes, minimal debris.
- Starting material: Optimize empirically for each species and tissue type. A typical starting point for mycelium or spores is within the range commonly reported in the literature for the target organism; adjust based on nuclear recovery and downstream performance.
- Protoplasts: Sufficient quantity to yield the required number of nuclei after extraction.
- Nuclei: Use an appropriate number of nuclei per reaction to ensure robust data quality; optimize based on empirical testing.
- Zebrafish samples:
- Embryos/larvae/tissues: Healthy, developmentally staged, free from contamination.
- Cell suspensions: Viable, single‑cell suspension from dissociated embryos or tissues.
- Starting material: Optimize empirically based on developmental stage and tissue type. Literature references for related methods (e.g., ChIP‑seq) may serve as an initial guideline; adjust for CUT&Tag as needed.
- Nuclei: Isolated nuclei should appear round with intact membranes and minimal yolk/debris contamination.
For all sample types, count at harvest and again before ConA bead binding to confirm minimal sample loss. Prepare 10% excess material to compensate for losses during processing.
III. Sample Preparation Workflows
III. Sample Preparation Workflows
(A) Mammalian Suspension Cells
Applicable to: Fresh, unfixed, non‑cryopreserved suspension cells.
Starting amount: Prepare sufficient cells for the number of reactions, plus a surplus to compensate for sample loss during processing. For initial experiments, cell numbers commonly used in the literature for related methods (e.g., ChIP‑seq, CUT&RUN) may serve as a reference; optimize empirically for CUT&Tag based on cell type and target protein abundance.
- Stain an aliquot of cells with Trypan Blue to confirm viability and normal morphology.
- Centrifuge at appropriate speed for 3 min at room temperature (RT); aspirate supernatant.
- Resuspend in an appropriate volume of RT Wash Buffer with gentle pipetting; centrifuge at appropriate speed for 3 min at RT; aspirate supernatant; repeat once.
- Resuspend in a suitable volume of RT Wash Buffer.
- Count an aliquot of the resuspended cells to confirm cell number meets requirements.
- Add the cell suspension to activated ConA beads; gently vortex to mix; briefly centrifuge to collect liquid from tube walls.
- Incubate for 10 min at RT to allow cell adsorption to beads.
- Place on magnetic rack; after clearing, stain a small aliquot of supernatant with Trypan Blue — successful binding should yield no cells in the supernatant. If numerous free cells remain, extend incubation at RT for 5 min.
- Discard remaining supernatant; do not allow beads to dry out.
- Remove from magnetic rack; immediately add an appropriate volume of cold Antibody Buffer (CUT&Tag: use Wash Buffer 1; CUT&RUN: use Wash Buffer; the two are not interchangeable) and resuspend by pipetting.
- Stain a small aliquot of the bead‑cell mixture with Trypan Blue to confirm cells are bound to the brown ConA beads.
(B) Mammalian Adherent Cells
Adherent cells may be processed with or without crosslinking directly on the culture plate prior to collection.
Without crosslinking: Collect cells by trypsinization or cell scraping, wash with PBS, and proceed from Step 1 of the suspension cell standard protocol.
With crosslinking: Process according to the crosslinking protocol in Section IV; after quenching, collect cells by scraping or trypsinization, wash with PBS, and proceed to the standard protocol.
(C) Mammalian Tissues
Tissues must first be processed into a monodisperse cell suspension, typically by mechanical maceration or douncing. Connective tissues may be digested with collagenase or dispase; macro‑dissected tissues may be treated with Trypsin (monitor closely to avoid over‑digestion).
Critical Note: Avoid processing agents containing glucosaminidase, amidase, neuraminidase, or mannosidase, as these enzymes interfere with ConA bead binding to cell surface glycoproteins.
If a complete single‑cell suspension is difficult to obtain (especially for CUT&Tag),isolate nuclei first(see Section D) before proceeding to the standard workflow.
(D) Mammalian FACS‑Sorted Cells
Pre‑sorting fixation: FACS imposes stress on live cells; pre‑fixation with standard FACS fixation/permeabilization buffers (0.5–4% formaldehyde) helps maintain cell integrity.
Post‑sorting counting: FACS‑reported counts are unreliable (may deviate by orders of magnitude).Manual recounting after sorting is mandatory. Maintain density at 1–5 M cells/mL (below this range, counting error increases; above this range, aggregation and lysis occur).
Antibody selection:Not recommendedto use antibodies targeting nuclear proteins for FACS sorting, as residual antibody can interact with pAG‑MNase and contaminate sequencing data. If antibody‑based sorting is required, use antibodies targeting cell surface proteins.
Nuclei isolation timing:Post‑sortingnuclei isolation is recommended, as nuclei are fragile and may not survive the sorting process.
(E) Mammalian Nuclei Isolation
- Isolate nuclei from the corresponding number of intact cells. Prepare fresh Nuclei Extraction Buffer (Section I) and pre‑chill on ice.
- Harvest cells, count, and confirm viability.
- Centrifuge; aspirate supernatant.
- Resuspend in cold Nuclei Extraction Buffer; mix by pipetting (do not vortex).
- Incubate on ice for 10 min.
- Centrifuge; aspirate supernatant.
- Success indicator: Pellet changes from viscous pale yellow (cells) to white and fluffy (nuclei).
- Failure indicator: Pellet remains yellowish and viscous — indicates incomplete nuclear lysis; extend ice incubation time.
- Resuspend nuclei in Wash Buffer (CUT&RUN) or Wash Buffer 1 (CUT&Tag) as appropriate.
- For cryopreservation: Resuspend nuclei in Wash Buffer supplemented with a suitable cryoprotectant or dedicated nuclear cryopreservation buffer. Transfer to cryovials and freeze slowly at –80°C. Proceed to Section (F).
- Stain an aliquot with Trypan Blue for microscopy — isolated nuclei appear blue with clear borders and minimal debris; intact cells appear bright white and round.
- Nuclei resuspended in Wash Buffer can be added directly to activated ConA beads; proceed from Step 6 of the suspension cell standard protocol.
(F) Mammalian Nuclei Cryopreservation and Thawing
Cryopreservation: Aliquot nuclei into tubes at a volume suitable for your experimental design, including a surplus to compensate for freeze‑thaw losses. Slowly freeze in an isopropanol‑filled freezing container at –80°C.
Thawing: Critical requirement — nuclei must be stored at –80°C for at least 24 hours before thawing (nuclei frozen for less than 24 hours are unstable and yield high background). Thaw by placing the tube on ice for 5–10 min, working quickly to avoid nuclear lysis and chromatin fragmentation. Thawed nuclei can be added directly to activated ConA beads and processed through the standard workflow.
(G) Plant Tissue Sample Preparation
Applicable to: Young leaves, root tips, and other actively dividing tissues (high nuclear content, low debris); seeds, mature roots, and other specialized tissues may require increased starting material.
Starting Amount: Determine optimal input empirically for each tissue type; prioritize young, fresh tissues.
Sample Collection and Storage:
- Rinse fresh plant tissues with clean water, blot dry with absorbent paper, and cut into small pieces on ice.
- Immediately immerse in liquid nitrogen for 30–60 min; transfer to –80°C for storage or proceed directly to downstream steps.
- Avoid repeated freeze‑thaw cycles; prepare backup samples when possible.
Nuclei Isolation (critical step for plant CUT&Tag: removal of cell walls, cytoplasm, and contaminants such as polysaccharides and polyphenols):
- Liquid nitrogen grinding: Place frozen samples in a pre‑chilled mortar; grind to a fine powder with liquid nitrogen.
- Nuclei release: Transfer powder to pre‑chilled Nuclei Isolation Buffer; mix gently; incubate on ice for 10–15 min.
- Filtration: Filter through multiple layers of Miracloth (plant‑specific filtration fabric) or cell strainers to remove cell wall debris and unlysed tissue.
- Low‑speed centrifugation: Centrifuge at low speed for 5–10 min at 4°C; discard supernatant (removes cytoplasmic debris).
- Percoll gradient centrifugation (optional, recommended for debris‑rich tissues): Resuspend pellet in a suitable Percoll gradient; after low‑speed centrifugation, collect the intermediate nuclear layer.
- Wash: Wash pellet multiple times with nuclei wash buffer; removes residual contaminants (polysaccharides, polyphenols, etc.).
- Quality control: Examine nuclear morphology under microscope (ideal nuclei appear smooth and rounded, with minimal background debris); count nuclei.
- Bead binding: Bind nuclei to activated ConA beads (follow mammalian procedure in Section III‑A, Steps 6–11).
- Permeabilization: After bead binding, add a suitable detergent to permeabilize the nuclear membrane, allowing antibody and transposome access. Triton X‑100 is generally effective for plant nuclei; Digitonin may be less effective due to differences in sterol composition. If Digitonin is used, concentration and incubation time must be re‑optimized.
(H) Fungal Sample Preparation (fCUT&Tag‑Seq)
Applicable to: Filamentous fungi (e.g., Verticillium dahliae, Neurospora crassa, Fusarium graminearum) and dimorphic fungi (e.g., Sporisorium scitamineum).
Starting Amount: Optimize empirically for each species and culture conditions. A typical starting point for mycelium or spores is within the range commonly reported in the literature for the target organism; adjust based on protoplast yield and downstream performance.
1. Protoplast Preparation
- Prepare enzyme solution suitable for fungal cell wall digestion.
- Digest mycelium/spores in enzyme solution under optimized conditions (temperature, time, and agitation) for the target species.
- Filter through Miracloth or a suitable cell strainer to remove undigested fragments.
- Centrifuge at an appropriate speed for 10 min at 25°C.
- Resuspend in an appropriate volume of osmotic support medium (e.g., NaCl solution) and count protoplasts using a hemocytometer.
2. Nuclear Extraction
- Transfer the appropriate number of protoplasts to a 1.5 mL tube. Centrifuge at low speed for 5 min at 25°C; discard supernatant.
- Resuspend in an appropriate volume of cold Nuclear Extraction Buffer. Incubate on ice for 10 min.
- Centrifuge at low speed for 6 min at 25°C; discard supernatant. Resuspend nuclei in an appropriate volume of Wash Buffer.
- Count nuclei and adjust to the desired concentration for downstream applications.
3. ConA Bead Binding
Follow the standard ConA bead binding procedure (Section III‑A, Steps 6–11) to bind isolated nuclei to activated ConA beads.
4. Optional Crosslinking (for Chromatin‑Binding Proteins)
For histone modifications, skip this step.
- Fix fungal material with an appropriate concentration of formaldehyde for a suitable duration at room temperature (refer to literature for the target organism).
- Quench with glycine for 5 min at room temperature.
- Wash multiple times with osmotic support medium.
- Proceed to protoplast preparation (Step 1).
(I) Zebrafish Sample Preparation
Applicable to: Zebrafish embryos, larvae, and adult tissues.
Starting Amount: Optimize empirically for CUT&Tag experiments. Literature references for related methods (e.g., ChIP‑seq) may serve as an initial reference; adjust based on tissue type and developmental stage.
Sample Collection and Storage:
- Collect embryos/larvae at desired developmental stage; dechorionate if necessary.
- For embryos: deyolk manually or enzymatically; wash with PBS.
Note: Residual yolk can inhibit downstream enzymatic reactions (tagmentation and PCR). Ensure complete deyolking and perform an additional wash with PBS if necessary. - For adult tissues: dissect target tissues (e.g., fin, brain, liver) and mince into small pieces.
- Flash freeze in liquid nitrogen and store at –80°C, or proceed directly to nuclei isolation.
Note: Frozen samples yield lower nuclear quality compared to fresh samples; whenever possible, use fresh tissue.
Nuclei Lysis Buffer: Prepare fresh and pre‑chill. Use a buffer formulation suitable for nuclei isolation from zebrafish embryos/tissues (refer to literature for the target tissue). This buffer is for nuclei isolation only; do not use Wash Buffer for lysis.
Nuclei Isolation (for CUT&Tag/CUT&RUN):
- Transfer embryos/tissues to a Dounce homogenizer or grind in liquid nitrogen.
- Add cold Nuclei Lysis Buffer (freshly supplemented with Protease Inhibitor and reducing agent as required).
- Homogenize with appropriate strokes; incubate on ice for 5–15 min (optimize according to sample type to prevent nuclear rupture; for early embryos or brain tissue, start with the shorter incubation time).
- Filter through a suitable cell strainer to remove debris.
- Centrifuge at low speed for 5 min at 4°C; discard supernatant.
- Wash pellet once with Nuclei Lysis Buffer; repeat centrifugation.
- Resuspend nuclei in Wash Buffer; count and adjust to appropriate concentration.
- Proceed to ConA bead binding (Section III‑A, Steps 6–11).
Note: For fin regeneration studies, harvest regenerating fin tissue at the desired time point. Antibody cross‑reactivity across species should be verified for each target.
IV. Sample Fixation and Crosslinking (Optional)
IV. Sample Fixation and Crosslinking (Optional)
CUT&RUN and CUT&Tag are native techniques performed on unfixed cells by default; crosslinking is not required but may be considered for: labile targets (e.g., histone lysine acetylation), time‑course experiments with precise temporal resolution, or transient chromatin interactions (e.g., acetyl‑lysine reader proteins, chromatin remodelers).
Important: When testing crosslinking conditions for the first time,always include a native (unfixed) sample in parallel as a control.
Standard Crosslinking Protocol:
For crosslinking procedures (including mammalian cells, plant samples, and alternative strategies), please refer to the instruction manual provided with your selected kit. Crosslinking conditions — such as formaldehyde concentration, incubation time, quenching, and reversal steps — vary by product brand and target protein.
Note: For plant samples, crosslinking is optional and depends on experimental needs. When required, a mild crosslinking condition is generally recommended to minimize DNA loss. Alternative crosslinking strategies may also be available for specific applications; consult the kit manual for detailed instructions.
V. Troubleshooting Guide
V. Troubleshooting Guide
| Issue | Recommended Action |
|---|---|
| Mammalian cell viability <80% | If morphology is normal with minimal debris, switch to Propidium Iodide (light‑protected, fixed‑cell compatible) or reduce Trypan Blue concentration for reassessment |
| Plant nuclei with excessive debris | Increase Percoll gradient purification; increase wash steps to 4–5; grind thoroughly but gently to avoid nuclear shearing |
| Low plant nuclei yield | Use young, actively dividing tissues; extend liquid nitrogen grinding time to ensure complete lysis; increase starting material |
| Excessive debris in mammalian nuclei | Re‑isolate; reduce centrifugation force or shorten ice incubation time; avoid over‑pipetting |
| FACS‑sorted cell lysis | Increase pre‑sorting fixation; prioritize post‑sorting nuclei isolation |
| ConA bead binding failure | If numerous free cells remain in supernatant,extend incubation at RT for 5 min |
| Over‑crosslinking (DNA smearing) | Increase Proteinase K digestion time (extend to overnight); reduce PCR cycle number |
| Low protoplast yield | Optimize enzyme concentration and digestion time; ensure mycelium is in logarithmic growth phase |
| Protoplasts clumping | Reduce centrifugation speed; pipette gently; ensure osmotic support is adequate |
| No fungal nuclear pellet after extraction | Increase starting protoplast number; verify lysis buffer composition |
| Zebrafish embryo yolk contamination in nuclei prep | Increase deyolking steps; add an additional wash with Lysis Buffer |
| Low zebrafish nuclei yield | Increase starting embryo number; optimize homogenization conditions |
VI. Safety and Handling Precautions
VI. Safety and Handling Precautions
| Reagent / Operation | Precautions |
|---|---|
| 37% Formaldehyde | Strongly irritating; handle in a fume hood at all times |
| Trypan Blue | Cytotoxic; count cells immediately after staining; do not incubate cells with dye for extended periods |
| Protease Inhibitors | Buffers containing protease inhibitors should be prepared fresh and kept on ice at all times |
| Nuclei Extraction Buffer | Highly viscous;do not vortex; mix thoroughly by pipetting only |
| Liquid Nitrogen Grinding (Plants) | Wearsafety goggles and cryo‑gloves at all times to prevent splash injury;pre‑chill mortar and pestle before use |
| Enzyme solutions (for protoplast preparation) | Prepare fresh; avoid contamination; handle according to manufacturer's instructions |
| Zebrafish embryo homogenization | Keep samples cold at all times; avoid over‑homogenization to prevent nuclear rupture |
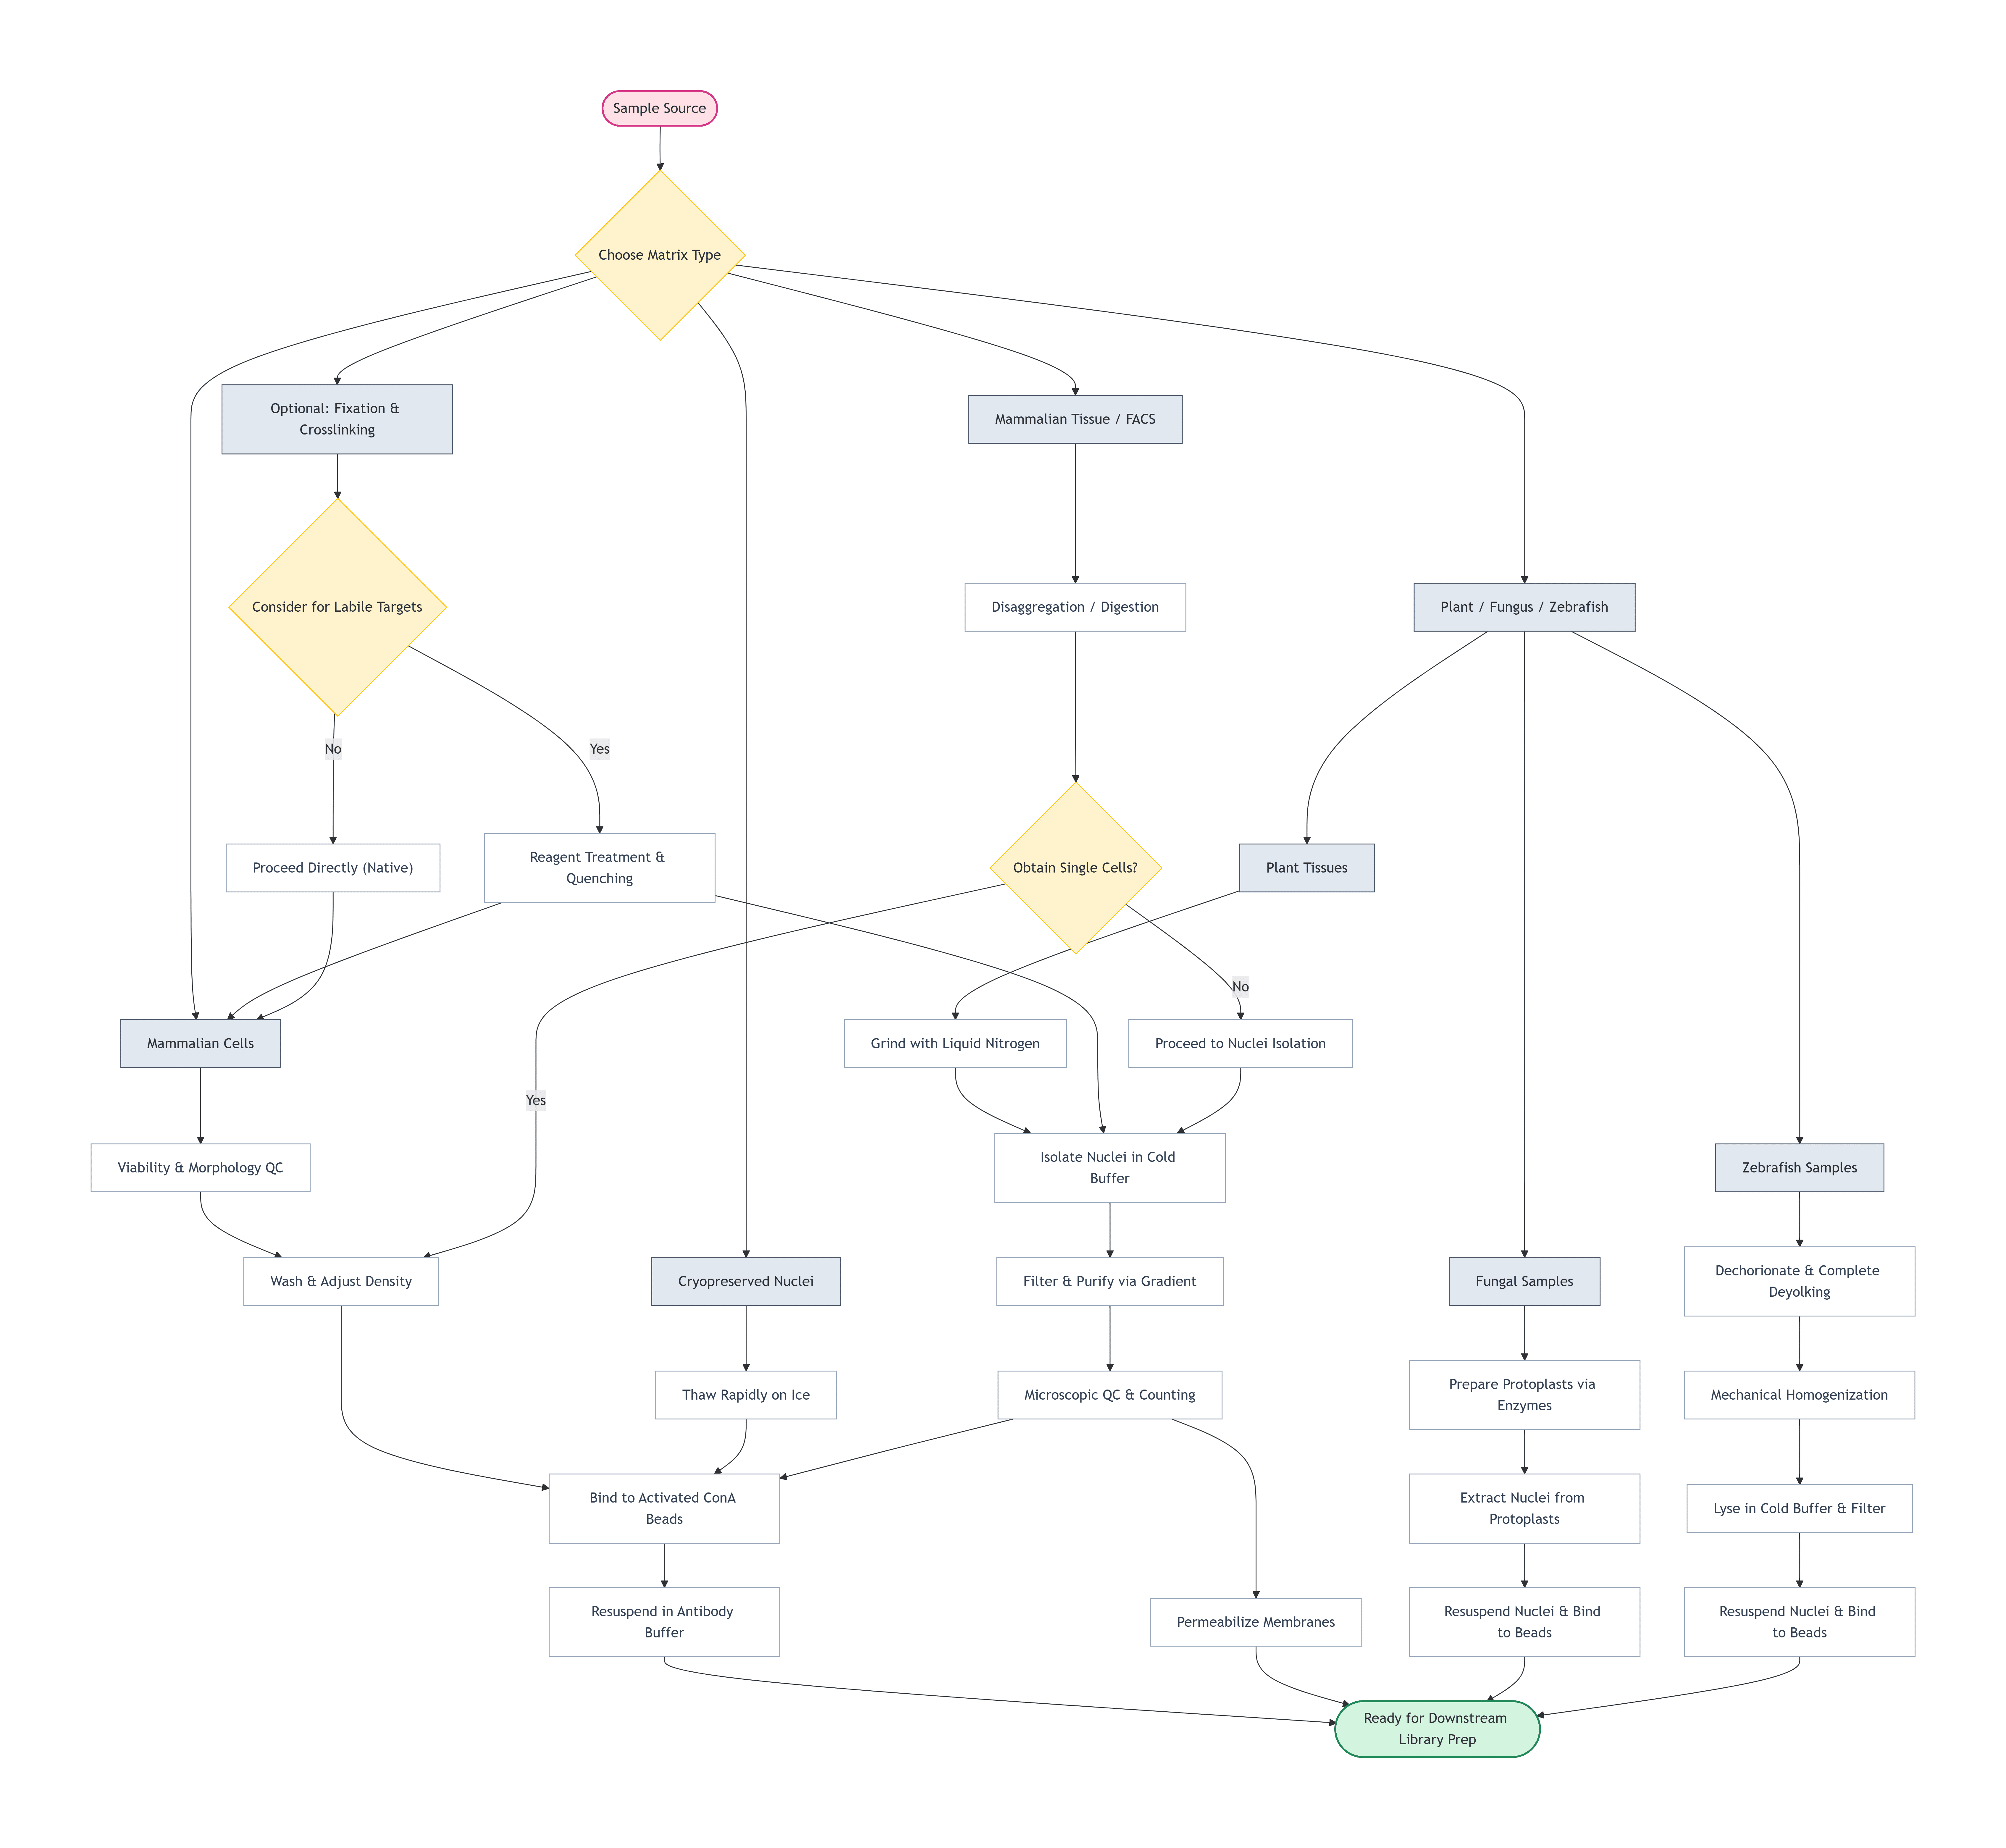
VII. Sample Type Selection Flowchart
VII. Sample Type Selection Flowchart
Sample‑source → Choose Matrix Type → different sample branches → Ready for Downstream Library Prep